Labels

Wednesday 30 April 2014

Level Backgrounds

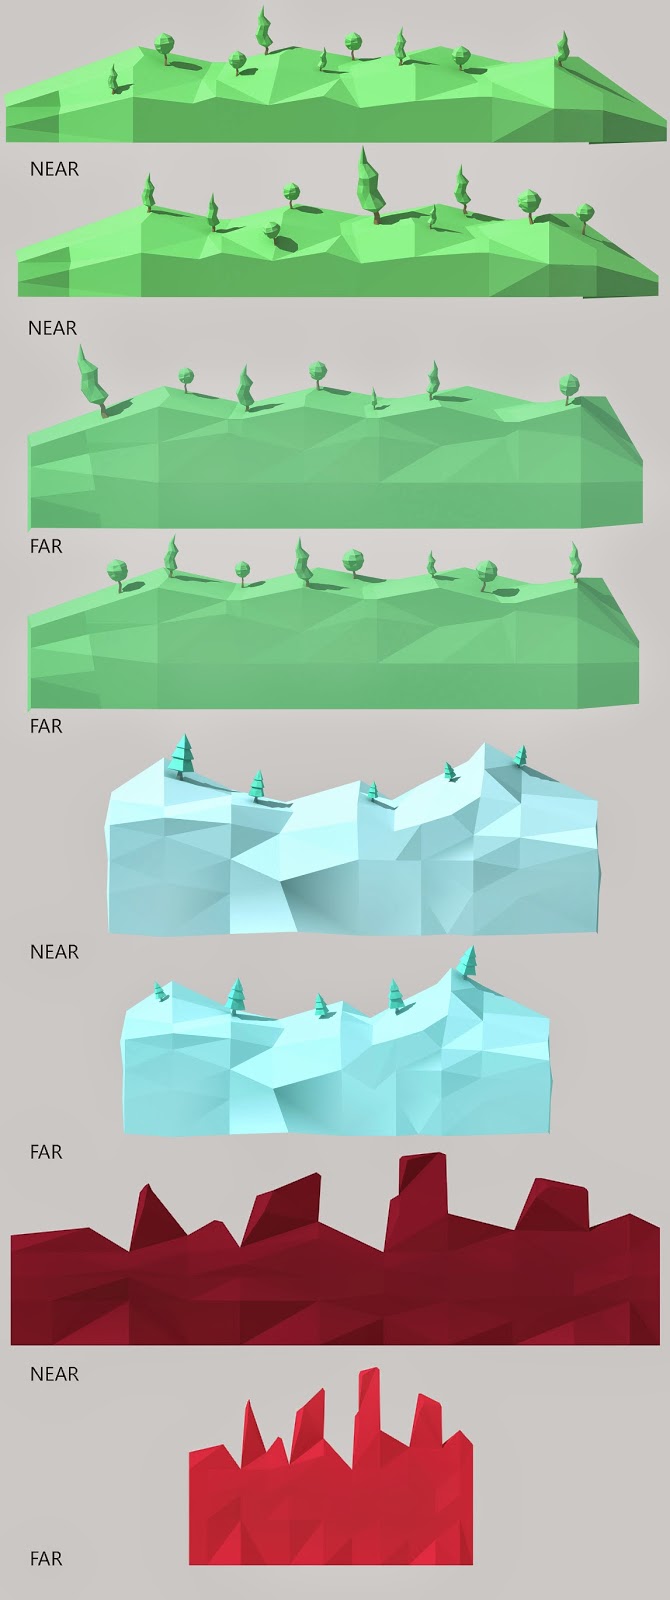
When we came up with the backgrounds, we originally wanted to paint them but we wasn't sure how we were going to match the length of each level without tiling. Our next idea was to model the background elements so we could still keep the triangulated look. Due to the large sizes of the meshs, we came across a problem with lightmapping, the light maps would stretch across the background meshes giving blurred shadows. To counter this we tried splitting the meshes into smaller pieces (a technique we had to use on some of the larger terrain pieces) but once again the pieces were still too large and could not be made smaller without adding more geometry, which is something we wanted to avoid because of the nature of the triangulated effect.

We solved our problem by rendering each background element separately as a layered psd using mentalray. I was then able to take these renders into Photoshop, these can then be saved off with an alpha channel and applied to 3d planes within Unity. Taking these into Photoshop instead of using the 3D models allowed me to have much more control over colours and giving slight false depth.


I had to match the shadow direction and colour the pieces accordingly to match the unity lighting as close as possible. This allowed me to take each piece into Photoshop and fade them based on the false distance.
The effect i used was to place a blue overlay over the each piece, the closer elements were set to 25% opacity while the far element were set to 50%.

I think this effect worked nicely but not 100% sure it translated as well in game, i think the far background could of been a little more faded. As i thought the colour difference wasn't as noticable in game as it was in Photoshop. Also in some parts of the Forest level, the platforms assets colour look too similar to the background so sometimes blends in. Mostly minor fixes so should hopefully be sorted before the grad show. 

You can see an example of this below:

Monday 28 April 2014

Particle Effects

Once the game had been built and the lighting had been set up and baked correctly, I moved on to start creating the particle systems for out in game particle effects. Particle effects have mainly been used to improve the aesthetics of the environment. However they have also been used to signify interactivity, character deaths, and many other elements. Each particle system uses different properties to define how it is emitted, and it is the emission of the particle systems that has the biggest impact on the way they look. Below are some screenshots of the particle systems and some explanation of how they have been made.


The above screenshot shows three commonly used particles from the game. The fire particles are emitted with a large start size which is shrunk over time as it moves upwards to achieve the flame shape. The colours also change over time to make the centre of the flame seem brighter. The glow that can be seen on the roof of the cave was created by using the render mode of the particle to distort it and create the ray shapes that can be seen. The sparkle on the torch is used to signify that an object is interactive, it is a fairly basic particle system that just slowly emits a few particles over time that shrink to simulate a cartoon styled sparkle.


In the above screen shot you can see the flowing lava particle as well as the surface lava particle. The flowing lava particles are all emitted in the same direction with gravity multiplier applied to give the effect that they are falling. The surface lava effect has been created by interpolating the start size of particles so that as they are emitted over a large area it creates a wave type effect. The ash particles can also be seen, they have a random velocity multiplier applied over time so that they flutter in random directions. They also have a negative gravity multiplier applied to get them to rise smoothly.


The fire trails and explosion effects that can be seen above are simply modified versions of the fire particle. The trails have had their size, speed and lifetime altered and the explosions are the trails with a fixed position.


The snow effects uses two particle systems. The first is falling snow that has a gravity and velocity multiplier that causes them to fall down at a random direction that can change to give the appearance that they are being blown around. The second particle system is the same as the first one but with the gravity multiplier removed to give the appearance that more snow is being blown around.


The dust particle above is exactly the same as the snow particle system but with the texture and colours changed. The firefly particle system is also the same as the dust and snow system but has a much small emitter so that they stay more closely grouped. 


The wind particle uses two separate systems. The first is used to create the gust effect that is emitted in waves. The second is the wind direction effect, this has been made by using vertically stretched particles and applying a rotation multiplier to emulate the spiralling of a fan.  

Friday 25 April 2014

Finished Enemy AI and Player Bug Spray

Once movement of the enemies had been scripted the next stage wage was to incorporate the glitched property of the enemies. When the enemies are bugged they cannot be killed by jumping on top of them and instead they must first be sprayed with bug spray to remove the bug to allow the player to destroy them. The enemies also swap textures when they are bugged to an alternate set to visually show the "bug". The code for this for both enemy types is nearly identical so the screen shots below represent the code for both enemies.

Below is a screenshot of what the enemies look like when bugged.


Once the enemy "bugs" had been added the next thing to do was to add the players bug spray as it is required to remove the bugs from the enemies. The bug spray was fairly simple to create and consists of a particle system to depict the spray and a mesh collider to detect whether or not an enemy is colliding with the spray. Below is a screenshot of the player and spray in game as well as a snippet of code that shows how the spray works.


Thursday 24 April 2014

Standard Enemy Rig and Export

 
Rather than creating three seperate meshes and rigs for each standard enemy, I rigged one mesh using human IK and positioned the bones correctly on one half of the body then just mirrored the bones for the opposite side. By default human IK appears in the 'T' pose but i modelled the enemys arms slightly lower in an attempt to avoid extreme deformation of the mesh so had to reposition the arm bones. I used smooth bind to link the bones to the mesh then bound each seperate set of accessories for each theme to the same rig so in unity it was possible to hide a particular asset allowing us to swap out textures for particular enemies.
 

  We came across a problem on the first export. The rig didnt have enough bones for unity to understand it as a human IK rig so no animation could be applied. After re-rigging there was yet another problem, the default bone settings in maya applied a scale compensation which damaged the mesh upon import but after unticking the box and re-exporting everything ran smoothly. The mesh doesnt look 100% what we had in mind when animated by unity but some tweeking in maya may lead to a better outcome.

Wednesday 23 April 2014

Game Dev poses

I big problem with our team was out of the three of us, none of us are particularly animators. While rigging and skinning took a while to get correct, we managed to find some basic animations online for the Main Character, while also using Unity's Mechanim, Luke managed to blend together animations with some unique static poses that were required for our game. It's a shame i didn't have the time or skill to get nice animations so poses will have to do for now.


Bug Spray Pose - This is used when a glitched enemy needs to be 'bug sprayed' 


Wall Jump Pose - Used for Wall jumping, when exporting into Unity we had a problems with the feet registering with being grounded on the Wall. In Unity the feet bend backwards and towards the wrong way, while this is something we would like fixed, it may have to be left for now as none of us are strong in the field of animating and would be far to time consuming to learn in the given time.

While ideally we would love fluid unique animations with cartoon rubber hose movement but this is one field where we have had to make do with what we can get so i could apply my strengths in other areas of the game.

Sunday 20 April 2014

Ice Level Assets and Terrain

 Here is the collection of all the models used to build up the Ice zone. I think the low poly triangulated effect works especially well on some of the ice pieces and on the water.
As this level was smaller i didn't have to worry about making more modular pieces of terrain, so each part of the terrain more modeled more unique. I think on some pieces of the terrain some of the 'tris' are a bit too big in comparison to the rest of the game, if we get more time to polish this is defiantly something to think about as it is more noticeable in game.

 
 Below are the Ice zone assets, keeping to the colour scheme i set earlier i modeled the various parts we needed to fill out the scene. This included the parts needed for the puzzles and 'covers' to fill the front of the inside terrain. There is also a piece of flint and a stick, this is used for the puzzles near the end of the level. To avoid the level feeling completely blue and white i decided we need some other colours that all blend nicely, this is why i created each level colour scheme earlier on. Gems and icy blocks all keep to the colour scheme and will hopefully be lit up within Unity to give the whole level a more visual appealing game.


While i'm happy with the results and the visual style, i believe some of the ice terrain would need changing a little, some wall jumping has proven a little difficult on some of the sloped edges because i did this at the time without taking the game mechanics in the consideration. I wanted to give the terrain a jagged, sharp edged look but i think it would suit a more softer feel but i guess that's something that came with doing low poly triangulation. If i had more time i would of also of liked to do more assets or variations but as it's a shorter more difficult zone, i don't think it's too much of a problem.


Wednesday 16 April 2014

Forest Level Assets and Terrain

Here is a collection of all the models and assets used to build up the forest level. Using basic triangulated shapes and trying to keep an interesting silhouette to make sure the assets were visual pleasing and consistent. We also thought it would be a clever idea to keep everything as modular as possible, meaning we can re-use terrain pieces and assets to build up the levels without having to model it all completely from scratch. 


As mentioned earlier in the blog, the forest level consists of a woody environment to begin with and then moves onto forest ruins. The ruin pieces could of probably had a better colour as the grey is a little drab but was hard to find a colour that wouldn't clash or not work with the rest of the environment. 


Here are all the modular Forest level assets, most of these are repeated throughout the zone to fill out the level. I think we could of had a lot more variation in each level but as a small 3 man group i think we did alright populating each area. As we went for this visual style and low poly models, means we spent a lot less time needing to un-wrap and texture each individual piece.

Monday 14 April 2014

Lighting and Lightmapping - Forest, Ice, Fire

Once I had started building out the levels with our terrain models I begun doing a few lighting tests in order to see which method of lighting would best suit our game. Originally we were going to use all dynamic lighting, however after running a few tests with lightmapping in Unity, we found that it gave much better results that more closely resembled the art style we were aiming for. Setting up and optimizing the game for the lightmapping process was not as simple as we had at first hoped, as several of the models were too large to fit onto our lightmap atlas and would appear pixelated during gameplay. In the end some of the larger models had to be split and our max atlas size and lightmap resolution was adjusted accordingly to give us the best possible results. Below are some screenshots of the first three sections of our level fully lit and lightmapped:


Friday 11 April 2014

Level Assets - Forest, Ice Fire

After the terrain had been imported and Jez and Elliot had finished modelling the majority of the level assets I started to fill out our level with the newly modelled assets. Below are screenshots of the levels with the newly imported assets:


Thursday 10 April 2014

Starting Enemy AI

Once the level mechanics had been finished the next bit of scripting that I had to do was to start some sort of AI system for our enemies. The system itself will be pretty basic as our enemies are only really designed to patrol specific areas or simple stand still. The only slightly complex aspect our our enemy scripts will be the code that manages when our enemies are bugged and what that changes about our enemies.

The standard enemy uses a character controller component as it was more suitable than a rigidbody. The standard enemies will constantly move forwards in any direction that they are pointed. If they hit something or come to a ledge they will turn around and begin walking in the opposite direction. This is done by checking the current velocity of the enemy as well as using a raycast to detect the edges of platforms. In order to "kill" the enemies in our game each one has a collision box attached to their head that detects a collision only when the player is jumping down onto them. Below is a screenshot of the standard enemy in the engine and the code that manages the direction of the standard enemy:


As well as our standard enemy that remains grounded at all times, we also have a flying enemy that acts in a similar way to our standard enemy. However instead of moving forwards along the X axis, the flying enemy moves up and down along the Y axis, sort of hovering up and down. Below is a snippet of code that shows how the movement of the flying enemy is achieved:


3D Thorns

 
Official Thorns


This is the final model of the thorn hazard, based on the second 2D Version, Only one has been modelled as it will be a highly repeated asset. This model is in two parts, the main body and the actual spikey thorn bits, this allows us to easily change texutres and apply new ones.

Wednesday 9 April 2014

Forest Level Mentalray renders.

Once i completely finished modelling the forest assets corresponding to Lukes initial sketches, i layed out roughly what the game could look like. Placing tree, bushes, rough backgrounds and other various assets to get an idea of what lighting and composition we want. Once i tweaked around with the Mentalray settings to try out different effects, this gave us a very clear idea of what lighting and overall art direction we were aiming for. 


Above was the closest to how we wanted the game to look, the colours blend nicely and nothing stands out too much. The only problem i had with mental ray was the white on top of the rolling hills, this was very hard to get rid of while preserving everything else. 


By changing the ground colour darker, this lead to this nice render of a possible night time version of the forest level. While this won't be used it was interesting to see what other themes could possibly be achieved. 

 Because of the block colours and low poly models is was very important to get this idea right, you can see below that a more over saturated look made the colours stand out way too much. While this did give a bright vibrant tone, i think we all preferred the more desaturated atmosphere in the earlier renders.


This then lead to Luke looking into how we were going to light our game, by light mapping and using light probes, we shall hopefully be able to recreate this look in Unity. 


Friday 4 April 2014

Importing Terrain and Puzzle Assets - Forest, Ice, Fire

Once the mechanics for each level were finished I had to import and build  the first three sections of our level with the models that Jez and Elliot had made. All scripted objects were replaced with the asset counterparts and all terrain was positioned to roughly match the old grey box. After initially building the forest section I found out that the collision geometry of the original greybox did not exactly match the geometry of the newly modelled terrain. In order to ammend this I made a new set of collision geometry out of cubes in Unity, that more accurately matched the shape of our terrain. Below is a screenshot of the new collision geometry and each of the levels built: